HOW TO TINT YOUR CAR?
First, the basics…
Step #1: Let a professional tint your windows!
Otherwise, read on and proceed at your own risk!
Start with a clean car, and a relatively dust and wind free environment. The tint is applied on the inside of the windows, you may work the window tint on the outside…
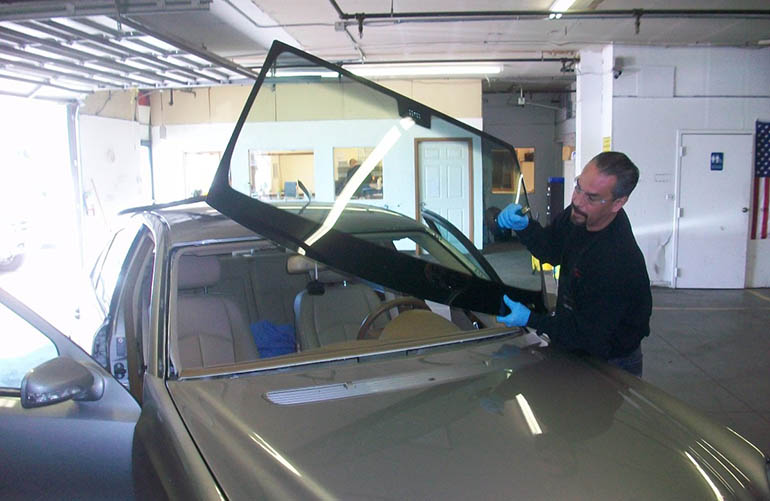
Here we are working with the tint on the outside of the window. It is being heat formed to accept the compound curvature of the glass. Once the tint has been formed it is then left in place and trimmed to the proper size.
…but the window tint is finally installed on the inside of the windows with soapy water, so you may need to remove the 3rd brake light and/ or rear deck if they are against the clear part of the glass, this can be a learning experience in itself.
Preparation
First, get the right tools for the job, a heat gun…
You don’t need a super high quality heat gun; an inexpensive one will do the trick. Always use the highest heat setting. Many tinters use two heat guns strapped together to get a wider, hotter working area. You can get a decent heat gun at any hardware or paint store for fewer than 50 dollars. Don’t forget the extension cord. 😉
A tinting squeegee
This is a black rubber smoothie tinting squeegee. They come in different lengths that you cut to your desired length. This will be your main working squeegee for car tinting. Some like to use the yellow or red turbo version. These versions are made of a stiffer material and are less pliable, but they move more water from underneath the tint.
This is a 24 inch length of uncut squeegee material. I believe this smoothie squeegee material is only available from tint suppliers as I have never seen it for sale anywhere else. Be careful cutting this stuff, I suggest using a vice to hold it and a hacksaw to cut it, but of course I don’t follow my own advice, I hold it in one hand against the table and use a fully extended olfa knife to cut it. Don’t try that at home kids…I’m a professional. 😉
Spray bottles and hard cards
Here’s the thing about tinting, every tinter works a little differently because this trade is really an art. Part of this art is crafting your own tools. Up until recently, no one really concentrated on making tools for window tinters, so we have to make up tools and techniques as needed. Hard cards are one of those tools that can’t be bought, they must be made.
Red devils
This is a “Red Devil” paint masking tool. These things are GREAT. They are very thin, but they have a slight curve that gives them strength. They can be cut into various triangle shapes and work very well for holding the flaps back while tucking roll downs, or pressing out a pesky corner in a quarter panes / window. The only problem is, I can’t find them anymore! They have been replaced by a thin aluminum version, which I’m sure works great for it’s intended purpose, but they are now useless for tinting.
A cutting surface (I use linoleum glued to plywood as a cutting table for patterns, a piece of flat glass will work too) butcher paper (plastic coated on one side), a snap off razor blade knife, razor blades, Baby Shampoo(15 drops per pint or so.), paper towels (preferably paper shop towels), and some hand tools.
On to the job
First you want to clear anything that will get in the way or that is against the glass where the window tint needs to be, like the inner flaps on the door panel where it goes down into the door…
On this car the inner flap lifts right out of the door without having to remove the door panel. These cars are always nice to have as it saves a lot of time. A quick check should be made on all cars to see if the flaps lift out like this before removing the entire panel until you know which cars you can do this with. Some cars need to have the top of the panel pulled back a little before the flap rail will lift out. Be very careful when pulling the top back. Depending on the car, you can tape this back with masking tape…
Remove the rear deck, and or 3rd brake light IF NEEDED. You will appreciate it when you’re in there trying to lay a long piece of window tint without touching anything but the clean glass, its not that easy and if the felt from the rear deck is against the glass, the tint will be difficult to reach and squeegee completely. Most cars only need to have the brake light removed.
Side Glass
One way to pre-cut the tint for the roll up windows is on the window itself, placing the window tint on the outside, with the liner side facing up, the tint can be trimmed to the approximate shape of the window
To shrink the door pieces, I place the tint on the wet outside about an inch above the bottom flap and about an inch to the left or right of the side felt, squeegee the tint so that its tight on top and all the excess is on the bottom, then wet shrink the excess tint on the bottom.
When you’re ready to tint the car window, start with the glass rolled down so that the top of the window is about a half inch from the felt, Clean and prepare the glass to receive tint, lay the tint near the bottom of the soapy wet glass first and slide it down into position as you lay the top into position.
Make sure both the glass and the tint are absolutely clean first. Apply your slip solution to the window, remove the liner from the window tint and apply slip to it as well. Carefully position the window tint onto the glass. Be sure to use enough slip agent in your solution or the tint may stick prematurely. This almost always leads to more contamination and flaws in the window tint.
Then squeegee from an anchor point to keep the tint from moving
Once you have it perfectly in place, keep it steady with one hand, having your fingers spread out so you have it firmly. With your other hand, make a few light passes to begin to anchor the tint. Use more and more pressure as you feel the tint begin to grab the glass. Once it’s all sqeegeed out, mist it with slip solution and squeegee it agian firmly to get more moisture out.
working from the middle out. Roll the window up and squeegee the bottom out. Blot any water from the sides with a hard card wrapped with a paper towel.
To prevent gaps, stationary 1/4 panes should be cut slightly
oversize and the inner rubber should be trimmed
to accommodate the slightly larger piece of tint.
Cleaning the glass in preparation
This is the main thing about window tinting, keeping the dirt to a minimum. This may be hard to follow, but I’ll try to keep it understandable. Most cars have a felt edge inside that guides the glass as it rolls up and down. When this felt gets wet it ‘bleeds’ tiny black felt hairs.
These really stand out when the film is dry. To avoid this I will roll the window as far down as it will go, and cover the felt with masking tape, then roll the window back up until the top of the window is about 1/2 inch from the top. Spray the window down with soapy water (10 drops of Joy dish soap per pint) and clean it with a new razor blade. The blades won’t scratch if they are new and the window is wet. Spray the glass again lightly, get a blue shop paper towel and wipe the edge of the glass and frame in one stroke to pick up heavier dirt, wipe your squeegee with a moist blue shop paper towel, and make one pass along the side of the window, wipe your squeegee again, start at the dry side you just did and squeegee side ways to the other side, repeat until you reach the bottom. Then a last stroke down the side you were squeegeeing toward and the window should be completely clean and dry. Next flush the window from the top down with soapy water keeping the very top edge dry. If you flush the very top edge, it will bleed dirt, as your squeegee won’t quite dry the top. Flush the middle first, finish by flushing the sides.
Even after all this, if you don’t handle the car tint well, it will get dirty. Peel and apply the tint.
As you are squeegeeing, (on roll up windows) do the top first, work down avoiding the edges until last, stroke them downward, some times I will use a thin card, like a credit card cut into a triangle to squeegee the last stroke down the edges, it depends on how tight the frame is. Spray the tint and squeegee it again, more firmly this time, to remove more water from under the tint
Back Glass
For the back window, most shops will do them in one or two pieces (depending on the car), with the heat shrinking method. This is a very tricky technique, and is very easy to mess up if you don’t know what you are doing.
Here there are two pieces of tint lying against a back window. The rear window has a compound curve, a curvature both up and down and left to right. The result is a flat piece of tint will not lay flat on a rounded shape. This causes the tint to lift off the glass in several places. In the picture there is water underneath the tint so you can clearly see the finger shaped excess tint areas. This is where heat shrinking comes in. If we don’t shrink the tint we will have to use multiple pieces, and we don’t want to do that.
If you can’t heat shrink the tint for the rear window, you can used seamed pieces, usually 4 pieces of tint will lay flat on most rear windows, some can be done in fewer strips.
Cut the strips so that the pieces will overlap each other on a defroster line (if the car has them), then, when you are lying the tint inside you can cut both pieces at once along the line, to make a ‘butt seam’.
Most rear car windows have a compound curve, a curve on the horizontal plane and a curve on the vertical plane. This prevents the window from being tinted with a single piece of tint without using the heat shrinking method.
Once the tint has been formed it is then left in place and trimmed to the proper size.
A good analogy is trying to wrap paper around a basketball; the paper will not lay flat without creases and folds. One way to overcome this is the same way a basketball is made, with pieces and seams. Most rear windows can be done in four pieces of tint with three seams. The seams can be hidden by the horizontal defroster element. You should first cut all of your pieces to shape, and then install them. Make sure to use new high quality stainless steel razor blades to reduce unavoidable glass scratches. Try not to use carbon razor blades or olfa knives on glass, the will almost certainly scratch the glass, especially on the outside!
Spray the inside of the glass with soapy water and scrub it with a white abrasive dish sponge, paying extra attention to the edges and the dotted areas.
Yup, it’s a white dish scrubbing sponge. Only use white or blue scrubbies, the green ones scratch glass if you don’t know what you’re doing. Yup.
Squeegee the glass dry and wipe the dotted edge with a paper towel to lift up the black residue the ceramic edge gives off, (This will help the tint to stick to the dots.) and spray the window again, this time squeegee very carefully to get all of the water off. Now flush the window from the top down, avoiding the very top and the dots, if the window has them, to prevent dirt from bleeding down. Just flush the area that’s going to receive the strip of tint.
Lay all the cut tint out on the wet cutting table so you can pull the liner off without it laying over onto itself (if dry adhesive surface touches itself you will need to start over as it will stick tint).
Weather you use a cutting table or mounted glass, keep it clean! Squeegee it clean and dry often. Mist your table or mounted glass and place the tint in a good position. You are going to peel the tint here so you want it clean, and in such a position that you can quickly pick it up and mount it with a minimum of movement through the air to avoid contamination.
Once you have your glass prepared, mist down the air in the immediate area to control dust and static, and then peel your tint. Get a corner started with your teeth and slowly peel away the liner, keeping the part that is peeling on the cutting surface to keep it from creasing. If you let the dry adhesive touch itself once the liner is off, the tint is ruined, so spray the adhesive as you peel.
Wash the windows in preparation to receive the tint one at a time. For the back window, use a white dish scrubber not a green one (it will scratch). For the side glass use razor blades and soapy water, squeegee clean, then spray with soapy water, go peel the tint, and spray it with soapy water too, pick it up and lay the tint onto the wet inner glass, position it until its just right, squeegee most of the water out, then lay the next piece, squeegee both, then cut along the defroster line to make a butt seam making sure not to cross and cut any defroster lines as they will no longer work.
OK, you have the glass all wet, the tint all peeled and wet, so we need to get the tint to the window. You should rehearse this movement beforehand if you aren’t experienced. Without touching the adhesive side of the tint, lift it up (yes I really just said that, if you have to, just use the very tips of your fingers or fingernails on the very edge of the tint where it’s not going to show) and place it onto the glass.
Carefully position the tint around any obstacles. The more it gets bumped or the edges lift from touching something, them more contamination will be drawn under the tint. If you need to make cut outs for obstacles such as defogger element posts or strut mounts, it would take to long to explain how to do all the pre, post and during techniques. You are going to have to experiment.
Start from a small anchor point and squeegee horizontally, following the defroster lines. Those lines grab the tint pretty quick, so make sure you have the tint in all the right places. After the squeeqeeing is done, mist the tint and squeegee again much more firmly to remove as much water as possible.
Some cars have the radio antenna on the window with the same type of line; do not cut these as your antenna will not work anymore! Remove the cut away pieces as you lightly spray soapy water where you lift the tint away from the glass, squeegee out the seam, then lay the next strip and so on.
After you apply the tint for the doors wait a little while before you put the panels back on, or removing the masking tape from the flap. After all the tint is laid and cut, here and there parts of it might pop up, push them down with a bondo card then blot any excess water from the window tint with paper towels.
Go peel the tint and carefully lay it into position without creasing it or touching the adhesive side, or letting it touch anything but wet glass. If it hits a dry spot of glass it will grab, so be methodical, don’t be afraid to rehearse how you are going to get in the car without using your hands holding a long strip of tint. Once it is in position, carefully squeegee it out, prepare the next section of glass as above, and lay the next piece in. Once the second strip is squeegeed out, cut the butt seam at the defroster line.
Try to cut on the top edge of the defroster line on the glass and not in the metal of the line. Make sure to cut firmly through both pieces of tint to get a good clean seam the first time. Make sure to use new high quality stainless steel razor blades to reduce unavoidable glass scratches. Try not to use carbon razor blades or olfa knives on glass, the will almost certainly scratch the glass, especially on the inside! After the cut is done, remove the extra pieces. To remove the piece that is under the second strip, peel back the corner of the second strip just enough to grip the extra piece, and pull the strip of extra tint out slowly as you spray a little soapy water to keep any dry spots from grabbing. Once the excess pieces of tint are gone, squeegee both the first and second pieces firmly, prepare the next section of glass and repeat as above until all 4 pieces are in and all three seams are cut and your done.